
How to Tighten Garage Door Springs Safely
If you are wondering how to tighten garage door springs without making a dangerous mistake, you are not alone. Many homeowners around The Woodlands, Texas deal with a stubborn garage door at some point and are tempted to fix it themselves.
You absolutely can learn what is happening with your spring system, how to spot when springs need attention, and what is realistically possible to do safely as a homeowner. You also need to know when to stop and call a technician before you damage the door or get hurt.
This guide walks you through:
- How a garage door torsion spring works
- Clear signs your garage door spring needs adjusting
- Whether it is possible to adjust the spring yourself
- Step by step basics for adjusting torsion safely (for experienced DIYers only)
- When it is time to replace springs instead of tightening them
All in plain English, with a realistic look at risk and cost.
Understanding your garage door spring system
Before you adjust or replace springs, it helps to know exactly what you are looking at when you stand inside your garage and look at the top of the door.
Most modern garage doors in The Woodlands, Texas use one of two spring types:
- Torsion spring system, mounted on a steel shaft above the top of the garage door
- Extension springs, which run along the side of the door, above the horizontal tracks
What is a garage door torsion spring?
A torsion spring is a heavy steel coil mounted on a shaft that runs across the top of the door.
When you close the door, the spring winds up and stores energy. When the door opens, that stored torsion (mechanics) energy helps lift the weight of the door.
Key parts of a typical garage door torsion setup:
- Steel shaft above the top of the door
- One or two springs (a double spring system has two springs on the shaft)
- Spring cone at each end of the spring, with holes for a winding bar
- Set screw in the cone that locks the spring to the shaft
- Drum at each side of the shaft, with the end of the cable wrapped around it
- Lift cable running from the drum down to the bottom bracket at the side of the door
All of this keeps the door balanced so your garage door opener does not do all the lifting. The proper spring tension keeps the door weight from fighting against you when you raise the door by hand.
Torsion vs extension springs on your spring garage door
Look at your door from inside the garage:
- If you see springs stretched along each side of the door near the horizontal tracks, you have extension springs.
- If you see a tube or shaft with coils on it above the top of the garage door, you have a torsion spring setup.
Both systems store significant tension (physics), but garage door torsion systems are especially dangerous to adjust without the right tools and training. That is why you will hear professionals talk so much about safety and using a proper steel rod as a winding bar.
Signs your garage door spring needs adjusting (or replacing)
You do not need to guess. There are very clear signs your garage door spring needs adjusting or replacement.
Common signs your garage door spring needs adjusting
If you notice any of these, your spring tension needs attention:
- The door feels heavy when you try to lift the door manually.
- The door is too heavy for the opener and the opener strains or makes new noises.
- The door won’t stay open halfway without you holding it. The door should stay around mid-height if the springs are right.
- The door closes too fast and slams to the garage floor.
- The door opens only a little, then stops or goes back down.
- One side of the door sags lower than the other, or the cable on the drum looks looser on one side.
These are classic signs your garage door spring needs adjusting, but they also might mean worn parts, a frayed cable, or that it is time to replace garage door springs, not just tighten them.
When springs need more than an adjustment
There are times when tightening or attempting an adjustment of the spring will not fix the real problem:
- You see broken springs – gaps in the coil or the spring split in two.
- The spring looks stretched, rusty, or distorted near the end of the spring.
- You have two springs and only one is working – the second spring looks different or loose.
- You hear a loud bang and after that the door won’t move or the door won’t stay open.
These are not adjustment jobs. They are time to replace signals. When a spring breakage occurs, you need to replace springs, not try to tighten the spring that is damaged.
Safety first: is it possible to adjust the spring yourself?
It is technically possible to adjust the spring on some garage door systems at home, but that does not mean it is a good idea for every homeowner.
Why torsion spring work is risky
Torsion springs store a lot of energy. That tension in the spring is what keeps the door balanced.
If the set screw slips, a winding bar comes out, or the steel shaft shifts unexpectedly, you can:
- Crack a bone if a bar whips around
- Damage the door system or drum
- Strip a screw or set screw and lose control of the spring
You will need at least:
- Two solid winding bar tools (never a screwdriver)
- A steady ladder
- A quality screwdriver or hex key set for the set screw
- Safety glasses and gloves
If you are not already very comfortable with tools, steel hardware, and careful step by step work, the safest move is to call a local pro in The Woodlands, Texas for garage door spring repair and replacement.
How to check the door’s balance before you touch anything
Before you adjust the spring tension, you need to check the door’s movement and balance.
This tells you if you may need to adjust or replace springs.
- Disconnect the garage door opener
- Pull the emergency release cord to disconnect the garage door opener from the door. This separates the opener from the door so you are working only with the door weight and the springs.
- Lift the door by hand
- Raise the door by hand to about waist or chest height.
- Let go carefully and see what happens.
- Watch how the door behaves
- The door should stay in place if the springs store the right amount of energy.
- If the door goes up on its own, the spring may be too tight.
- If the door stays open only for a second, then fall, the spring tension needs an increase.
- If the door won’t stay open halfway, or the door won’t stay in any position unless you hold it, that is a clear sign of incorrect or worn springs.
Also check the door’s travel all the way up and down. If the door closes hard or does not stay open fully, mention that to a technician or take note if you decide to adjust the spring system.
Tools and parts you need before adjusting torsion springs
If you decide to move forward with adjusting torsion, gather your tools first. Never rush this.
You will need:
- Two 18 inch or longer steel winding bars or rebar cut to fit the spring cone holes
- Wrenches or a hex key to match the set screw in the spring cone
- Locking pliers or C clamps to secure the door on the track
- A stable ladder
- A marker or piece of tape to mark how far you turn the springs
- Safety glasses and gloves
Avoid using a random screwdriver or cheap rod as a winding bar. A screwdriver can slip out of the side of the spring cone and cause injury.
Step by step: adjusting torsion on a spring garage door
This section is for educational purposes and for experienced DIYers. If any step feels beyond your comfort level, stop and contact a professional in The Woodlands, Texas. It is always better to keep your door working and yourself safe.
1. Secure the door and unplug power
- Secure the door at the track with a clamp or locking pliers just above one of the rollers. This keeps the door from moving while you work at the top of the door.
- Unplug the garage door opener from power. Make sure the door cannot open and close unexpectedly.
2. Locate the torsion spring and set screw
Stand on your ladder near the side of the door where the spring you want to adjust sits.
- Identify the torsion spring and the spring cone with the set screw.
- On a double spring system, you may need to adjust both springs so the door stays balanced.
Mark the side of the spring and shaft so you can see how far you turn the springs.
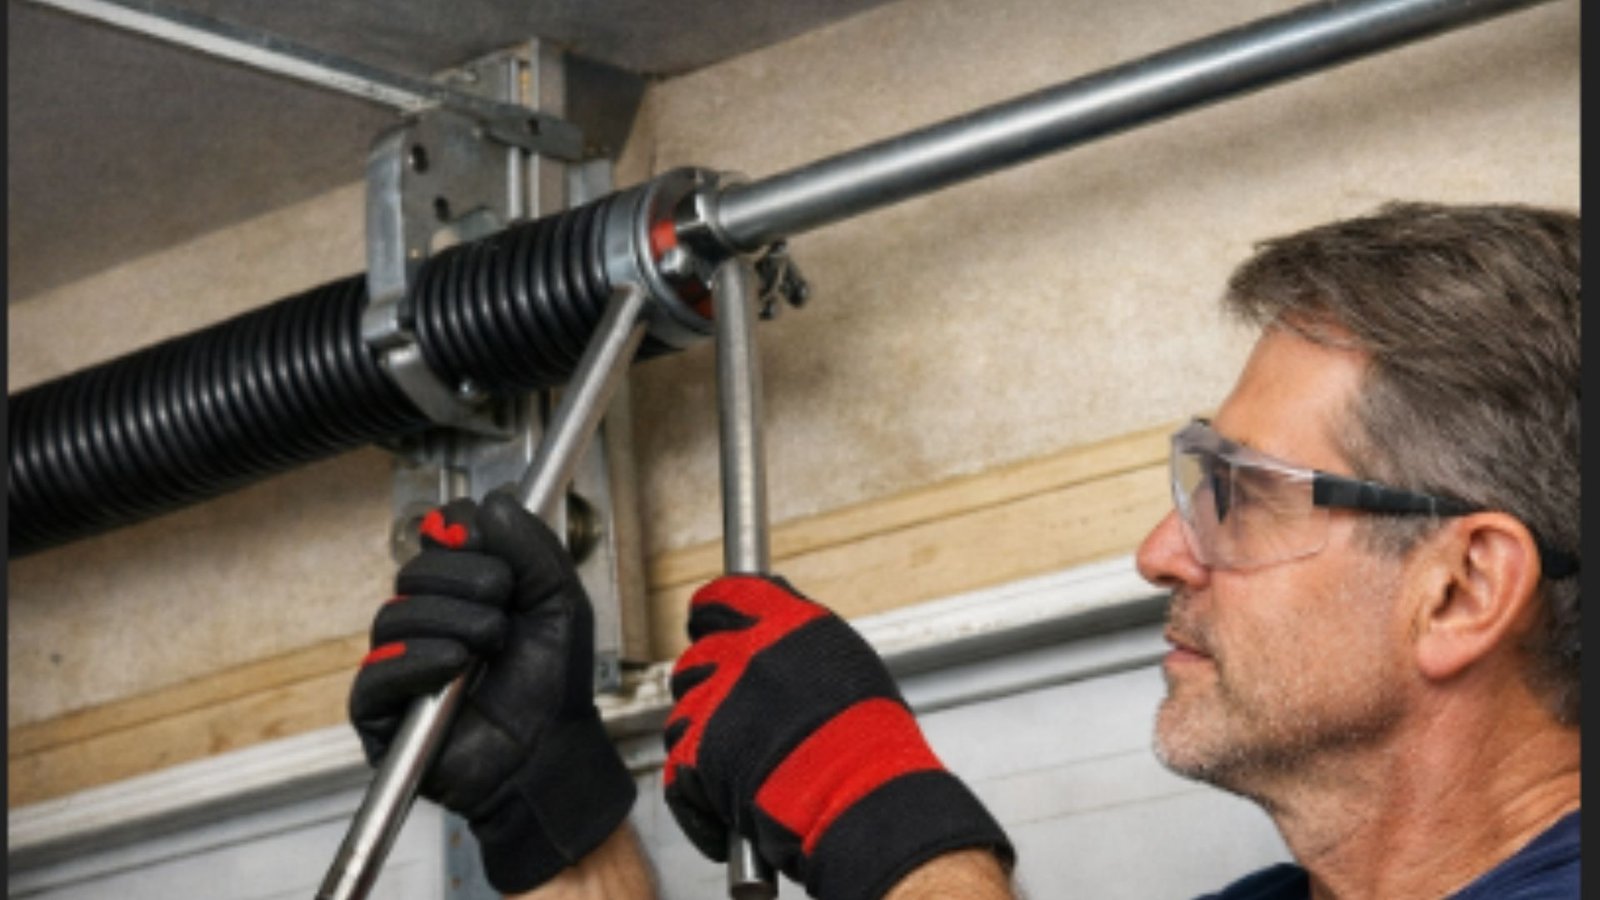
3. Insert the winding bar before you loosen anything
- Insert the first winding bar fully into a hole on the spring cone.
- Make sure it is firmly seated and level.
- Only once the bar is secure should you touch the set screw.
This is how you keep control of the tension in the spring.
4. Loosen the set screw carefully
With the bar supporting the load, gently loosen the set screw on the cone.
- Keep a strong grip on the winding bar.
- Do not loosen the set completely or remove the bar.
- You may hear a small shift as the spring moves.
Once the screw is loose enough for the cone to move along the shaft, you are ready to adjust the tension.
5. Decide whether to unwind or tighten the spring
Use the door test results:
- If the door feels heavy, or the door closes quickly and will not stay open, you are adding tension. You need to tighten the spring.
- If the door rises by itself and will not stay open halfway without moving higher, you need to unwind the spring and reduce tension.
Remember that every quarter turn increases or decreases tension in the spring. Careful adjustment of the spring is more important than speed.
How to turn the springs safely
Adding tension to lift the door better
To add tension:
- With the first bar in place, lift it upward (or downward, depending on spring orientation) to turn the springs in the direction that tightens them.
- Insert the second winding bar into the next hole in the spring cone before removing the first bar.
- Move in quarter turns, counting each turn, until you have made the planned adjustment of the spring. A typical adjustment might be 1 to 2 full turns for minor balance issues.
This process is how you gradually tighten the set screws to hold your new setting when you are finished.
Reducing tension if the door is overpowered
To reduce tension:
- With the winding bar in place and the set screw loosened, move the bar in the opposite direction to unwind the spring in small increments.
- Again, use the second bar to leapfrog from hole to hole so you never have only one bar in place.
Whether you are tightening or unwinding, you must keep full control of both bars until the set screw is tightened again.
Locking in your adjustment and testing the door
Once you adjust the tension:
- Tighten the set screws firmly with the spring in its new position.
- Remove the winding bars carefully.
- Remove the clamps or pliers from the track.
- Reconnect the opener from the door by attaching the release arm.
Now test the door:
- Lift the door by hand halfway and see if the door stays near that point.
- Check that the top of the door lines up evenly with the header when fully open.
- Make sure the door operates smoothly and does not jerk or bind.
If the door by hand still feels off, you may need to adjust the tension again slightly, or it might be that you need the correct springs instead of more tightening.
When to change the spring instead of tightening it
Tightening can only do so much. Sometimes you simply need a new spring.
You may need to replace springs if:
- The spring life is over and the coils are rusty, stretched, or pitted.
- There is visible spring breakage or cracking.
- The door weight has changed because you changed panels, added insulation, or replaced the door and never updated the springs.
- You have tried adjustment and the door still does not stay open or close smoothly.
If the door weight has changed, adjusting torsion cannot fix the mismatch. You need the correct springs that match the actual weight of the door. At that point, you should not try to change the spring yourself. Professionals use calibrated scales, specialty brackets, and tools to match springs to the weight of the door.
A spring without proper sizing is hard on your garage door opener and other hardware and will eventually damage the door or cause other door issues.
Extra checks that keep your door working smoothly
While you are up near the spring system, also check:
- Cable on the drum – look for fraying, rust, or the end of the cable slipping off the drum. The end of the cable should be fully seated and wrapped properly.
- Hinges, brackets, and rollers – inspect every bracket that holds the track to the wall. Look for cracks, loose screws, or bent steel.
- Lubrication – lightly lube hinges, rollers, and springs with a garage door approved spray (never heavy grease).
These small inspections, plus reasonable garage door use, can add years to your system and delay the need to replace springs.
Frequently asked questions
Can I just use a screwdriver instead of a winding bar?
No. A screwdriver or random rebar piece can slip out of the hole in the spring cone. You need a precise steel rod that fits tightly in the cone holes. Using the wrong tool is one of the fastest ways to lose control of the torsion and get hurt.
What if my door may be uneven even after adjustment?
If one side of the door may still look low or the door stays crooked, you could have a cable problem or a drum alignment issue, not just a spring problem. At that point, it is safer to have a technician inspect the whole door system.
Is tightening safer on extension springs?
Extension springs are also under high tension, but they typically use safety cables and can be somewhat less violent if they fail. Still, if you are not comfortable with clamps, brackets, and alignment, it is best to get help rather than experiment.
When to call a local expert in The Woodlands, Texas
Here is a simple rule of thumb:
- If the job is cleaning, lubricating, or doing a simple door balance test, most homeowners can handle that.
- If the job involves touching a torsion spring cone, set screw, cable, or drum, it is high risk.
If you are not fully confident in how to tighten garage door springs safely after reading this, that is a sign to bring in a specialist in The Woodlands, Texas.
A professional can inspect your door, confirm whether you can adjust garage door springs or if you need to adjust or replace springs entirely, and recommend a solution that keeps the door working properly and safely.
You can learn more about professional help at this page for garage door spring repair and replacement.
Final thoughts: keep safety first and know your limits
You now understand:
- How a torsion spring works and why the weight of the door matters
- The key signs your springs need adjusting or replacing
- The basic process to wind the spring or unwind safely with the right tools
- Why spring tension is only part of the story and why correct springs are so important
If you decide to try adjusting torsion yourself, move slowly, respect the energy that springs store, and stop immediately if anything feels out of control. If you would rather not risk it, that is perfectly sensible.
Use this guide to:
- Test your door by hand
- Spot problems early
- Decide whether tightening is realistic for you or if you need to replace springs
Take your time, ensure the door is secured before you touch the springs, and always put safety ahead of speed.